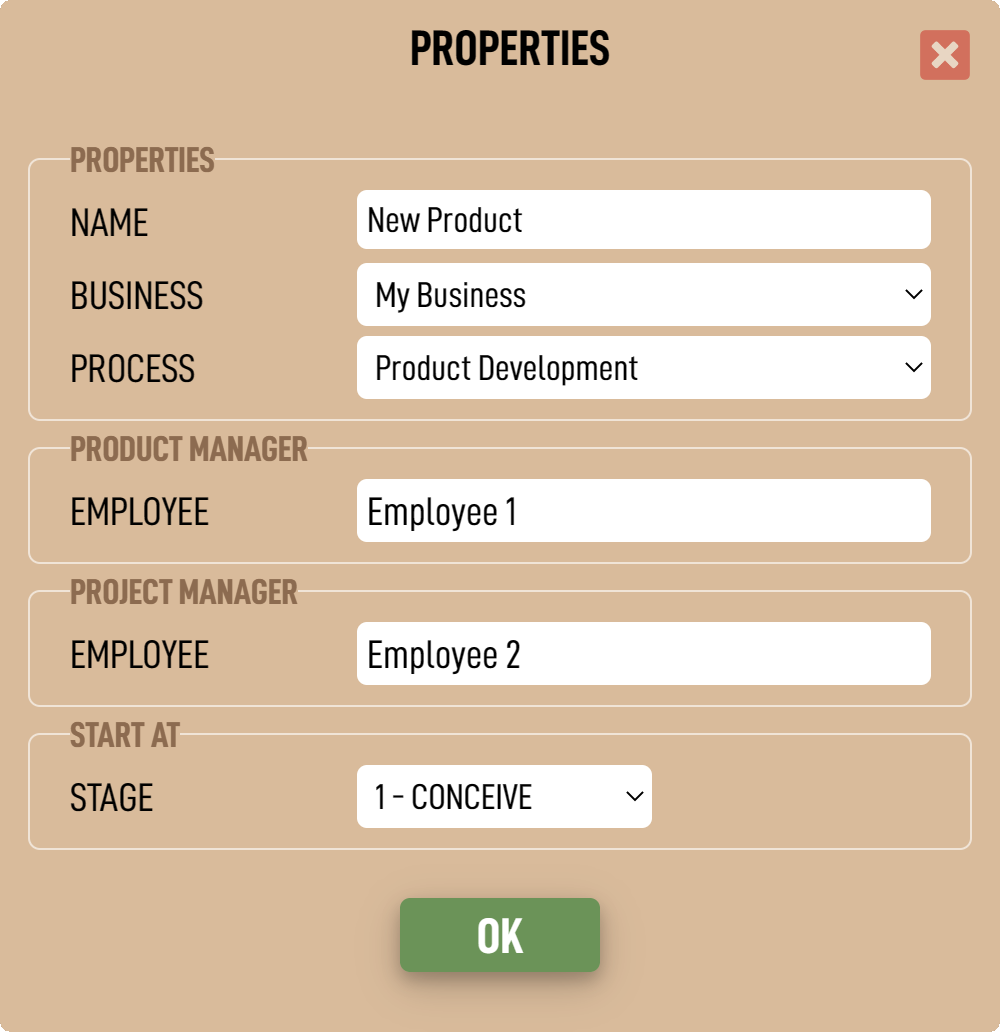
INDEX

1. ABOUT PRODUCT MANAGER
2. PRODUCT PROPERTIES
3. PRODUCT MANAGER
4. PRODUCT IMAGE
5. DESCRIPTION & UPS's
6. FINANCIAL TARGETS
7. PRODUCT LIFE CYCLE
8. PRODUCT REQUIREMENTS DOCUMENT
9. BUSINESS MODEL
10. BUILDING BLOCKS TOOL (BBT)
11. STAKEHOLDERS
12. NOTES
13. DOCUMENTS
ABOUT PRODUCT MANAGER
The 'Product Manager' page is specifically designed for Product Managers in order to assist in the rapid creation and development of a business model. It is used to describe and communicate a product to the rest of the business and is the 'front-end' of the NPI process, containing the following key information:-
  • Name, description & USP's
  • Product Requirements Document
  • Financial & business model
  • Product Images


All products in the business can be managed from this page.

Managing Products
1. Click the product name in the middle of the toolbar.


2. The 'Manage Products' sub-menu will be displayed.


A list of products will be shown in the main body of the sub menu. Two filters allow the list to be refined:-
  • The 'Status Filter' choses between 'current' products or 'deleted' products which is the list of partially deleted products.
  • The 'Business Filter' allows the products list to be refined by the 'Business' they refer to. (This is only relevant for Vizula Corporate customers.)

Selecting a Product
1. Click on any product to select it. The sub-menu will disappear and the main page will update with the selected product.

Adding a Product
1. Open the 'Manage Products' sub-menu as above.
2. Click on the 'Add New Product' icon and the 'Add Product' sub-menu will be displayed.


3. Choose a name for the new product and click 'ADD'.
4. The new product will be added to your list of products.

Deleting a Product
1. Open the 'Manage Products' sub-menu as above.
2. Click on the 'Enable Delete Mode' icon. and it will change to indicating that 'Delete Mode' is enabled.
3. Icons will be displayed in the left hand column of the product in the list as follows:
  • When the 'Status Filter' is set to 'CURRENT PRODUCTS', the 'Partial Delete' icon indicates that the product can be recycled to the deleted products list.
  • When the 'Status Filter' is set to 'DELETED PRODUCTS', the 'Full Delete' icon indicates that the product will be fully deleted.

4. Click on the product and a confirmation sub-menu will be displayed.
5. Click 'RECYCLE' / 'DELETE' and the product will be removed.
PRODUCT PROPERTIES
The product properties contain some basic key information required for the product including:-
  • NAME - This is the full name of the product.
  • BUSINESS - This is the business which 'owns' the product. The product will appear in the Business page and inherits the business currency.
  • PROCESS - This defines the process which will be used throughout the NPI life cycle.
  • PRODUCT MANAGER - The nominated Product Manager for this product.
  • PROJECT MANAGER - The nominated Project Manager for this product.
  • START AT - Products normally start at stage 1. However, for products which are being introduced into Vizula part way into their development cycle, you can use 'Start At' to define which 'stage' to initiate them to.

Editing The Product Properties
1. Click the 'Edit Product Properties' icon in the toolbar


2. The 'Product Properties' sub-menu will open.


3. Perform the edit and click 'OK'.
NOTE: The 'Product Properties' icon is only accessible to a user with Controller rights. If you don't see the icon, then rights have not been granted.
PRODUCT MANAGER
Changing the product manager is done via the 'Product Properties' menu.

Changing The Product Manager
1. Either click the PRODUCT MANAGER tile or click the 'Edit Product Properties' icon in the toolbar


2. The 'Product Properties' sub-menu will open.


3. Perform the edit and click 'OK'.
PRODUCT IMAGE
The Product image can be changed at any time.

Uploading a New Product Image
1. Click the Image tile 'Click To Change Image'.


2. The 'System File Dialog' will open.
3. Select an image you wish to use and click 'Open'.
4. The selected image will be uploaded to Vizula and will appear in the Image tile.
DESCRIPTION & UPS's
The product manager should use Description and USP's to quickly and efficiently communicate the main product to the NPI team and the business stakeholders. A strong, successful and winning product will more often than not, have highly identifiable unique selling points (UPS's) that sets the product apart from the competition. The USP's presented in Vizula are separated into six separate entries to encourage the product manager to think about each USP independently.

As a rule of thumb, a strong product should have a minimum of three clearly identifiable USP's.

Editing The Description & USP's
1. Click the DESCRIPTION & USP's tile.


2. The 'Description & USP's' sub-menu will open.


3. Perform the edit and click 'OK'.
FINANCIAL TARGETS
The financial targets for each product change according to which phase of the product life cycle (PLC) the product is at.

Phase 1 - Financial Targets
A product starts its life cycle at Phase 1.

During Phase 1, the Product Manager and his/her team will define all the criteria of the product in isolation to the NPI team. This helps to keep the NPI team focussed on existing product development and not get distracted by new product ideas. Included at Phase 1 are product management desired targets of TARGET RELEASE DATE and TARGET PRODUCT MARGIN. These initial targets are captured so that:
  • The NPI team understand what they are asked to try and achieve.
  • The accuracy of product management initial targets can be tracked.

Phase 2 to 5 - Financial Targets
Beyond Phase 1, the Project Management team take control of target costs, target margins and forecast release dates and therefore these are no longer required from the Product Management team. However, the retail price and sales price are critical to define the financial model of the product and these can continually vary until the product is launched. Therefore the Product Management team maintain control of these during the life cycle of the product.

Editing The Financial Targets
1. Click the FINANCIAL TARGETS tile.


2. The 'Financial Targets' sub-menu will open.

3. Perform the edit and click 'OK'.
PRODUCT LIFE CYCLE
The Product Life Cycle curve is a rapid way of creating a product forecast based on recognised marketing theory.

PLC Curve
The PLC Curve uses eight key parameters as follows:
  • MIN SALES - This defines the lowest number of units the product will sell per month.
  • PEAK SALES - This defines the highest number of units the product will sell per month.
  • LOAD IN AMOUNT - This defines a short term burst of sales, such as a load-in to a sales distribution network. The units are in % of PEAK SALES.
  • LOAD IN DURATION - This defines the short term period, in months, for the load-in.
  • GROWTH - This defines the amount of time, in months, that the product spends during the introduction into the market, and before the product experiences strong sales in the 'maturity' phase. During the growth phase, the product will gain market recognition and acceptance.
  • MATURITY - This defines the amount of time, in months, that the product stays in the maturity phase of the product life cycle. It is generally the most profitable stage of the sales cycle, the time when the demand is greatest and costs of production are stable and declining. But as the market becomes saturated, competition will increase and demand will start to weaken, driving the product into the final stage of its life cycle.
  • DECLINE - This defines the amount of time, in months, that product sales are in decline. Increased competition, alternative product offerings and saturation of the product means that market share will decline, driving sales ever lower. The next stage of the life cycle is end of life.
  • TREND - This defines an overall trend for the curve either positive (increasing) or negative (decreasing) in % of sales.


Editing The PLC Curve
1. Click the PRODUCT LIFE CYCLE tile.


2. The 'Edit Curve' sub-menu will open.


3. Perform the edit and click 'OK'.

Selecting an Average Curve
You can select an 'average' curve for the product by clicking the 'AVERAGE' curve button when the 'Edit Curve' menu is open. The average curve is calculated across all your 'active' product portfolio.
PRODUCT REQUIREMENTS DOCUMENT
The Product Requirements Document (PRD) is the detailed description of the product as generated by the Product Management team. It can consist of any number of PRD items and should cover all the main features, technical specifications and user benefits etc.

Each PRD item has one of four status values. These values are set by the Project Manager and can not be set by the Product Manager. They are as follows:
  • REVIEW - New PRD items have a value of 'REVIEW' meaning that they have not yet been 'scored' by the Project Management / NPI team.
  • REJECTED - An item that is 'REJECTED' by the Project Manager means that the NPI team determine that the PRD item is not possible. This should cause a discussion between the Product Manager and the Project Manager to determine how critical this item is to the success of the product, whether the item tolerance can be relaxed or the item removed from the PRD altogether.
  • MARGINAL - An item marked as 'MARGINAL' means that the NPI team are unsure at this time if the PRD item can be achieved. This should cause a discussion to find a suitable solution.
  • APPROVED - An item that is 'APPROVED' is the desired result and means that the NPI team are confident of being able to meet this requirement.

Editing the PRD
1. Open the PRD by clicking on the PRODUCT REQUIREMENTS DOCUMENT tile.


2. The PRD will open as follows:


The Product Manager is able to define the layout of the page, add new PRD items, edit existing items or delete items. The PRD is essentially fully controlled by the Product Manager with the exception of each item status.

PRD Layout.
Each PRD is set by default to be called a Product Requirements Document, with two columns, the first called 'Requirement' and the second called 'Value'. However, these items can be customised, eg to call it a 'Product Specification' rather than a 'Product Requirements Document'.
The layout can be modified by clicking the settings icon This will display the 'Settings' menu as follows:-


Adding a PRD Item.
1. Click the 'Add PRD Item' icon
2. A new PRD Item will be added to the bottom of the list as follows:-


3. The item will automatically be set to 'edit' mode, and editing can be made directly into the row.
4. The edit mode can be closed by clicking the 'Close Edit' icon on the right hand side of the PRD item. However, it does not need to be closed.

Editing a PRD Item.
1. Click on any PRD Item to put it into edit mode as follows:


2. The edit mode can be closed by clicking the 'Close Edit' icon on the right hand side of the PRD item. However, it does not need to be closed.

Deleting a PRD Item.
1. Click the 'Enable Delete Mode' icon
2. The icon will turn red and all PRD items will be put into delete enable mode, displaying a trash symbol in its left hand column.


3. Click on the PRD item you wish to delete and the a confirmation sub-menu will be displayed asking for confirmation of deleting the item.
4. Click 'DELETE' to remove the item.

Filtering PRD Items.
The specification items can be filtered by status value type by clicking on the relevant icon in the filter:-
  • Toggle this filter to show / hide the 'REVIEW' items.
  • Toggle this filter to show / hide the 'REJECTED' items.
  • Toggle this filter to show / hide the 'MARGINAL' items.
  • Toggle this filter to show / hide the 'APPROVED' items.

Reordering PRD Items.
1. Click on any PRD Item to put it into edit mode as follows:


2. Once in edit mode, the item position can be changed by pressing the 'up' and 'down' cursor key buttons.
3. The edit mode can be closed by clicking the 'Close Edit' icon on the right hand side of the PRD item. However, it does not need to be closed.

Downloading a CSV file.
1. Click on the download icon to download the full PRD list as a csv file.
BUSINESS MODEL
The BUSINESS PLAN tile gives a five year view of the Business Model of the product, calculated using the Product Curve as monthly unit data, and the Financial Targets for sales price and margin. It always shows the current calculation, using most recent data.


A snapshot of the Business Plan is taken at every product Phasegate sign-off in order to build a traceable audit of the business model. This can be used to ensure the business model does not go 'off track' and also to improve the NPI process through historical learning.
BUILDING BLOCKS TOOL (BBT)
'Building Blocks' is a tool for Product Managers to build costings based on historical designs. Often, new products are derivatives of existing products, using similar design blocks, materials, metalwork, components, castings, toolings and sub-systems. In Vizula, these design blocks can be entered into the Vizula library as library items, which contain a costing (min & max) and are then available to the Building Blocks tool in order to rapidly and more accurately build costing estimate for new products.


Building Blocks Totals
Two totals are calculated for each Building Block.
  • Min - This is the minimum cost sum of all building block items.
  • Max - This is the maximum cost sum of all building block items.

Hyperlinking to Library Item information
If a library item has been hyperlinked, then you can click the hyperlink icon to go straight to the linked page.

Editing a Library Item from the Building Block tool.
A user with Library edit rights can link directly to a library item by clicking the 'Library' icon
.

Downloading a CSV file
The Building Block can be downloaded as a CSV file.
1. Click on the download icon to download the full BBT as a csv file.

Using the BBT
1. Open the BBT by clicking on the 'Building Blocks Tool' icon. The BBT will open.


Adding a Building Block Item from the Library
1. With the BBT opened, click on the 'Add Item' (BLOCK) icon.
2. The 'Select Library Item' sub-menu will open.


3. Select the library item to add to the BBT.
4. The selected library item will be added to the Building Block Items list where you can now modify the quantity in column QTY


Editing a Building Block Item Quantity.
1. Select the item you wish to edit by clicking it. The item will be highlighted as follows:-


2. The quantity on any Building Block item can be adjusted directly in the Building Block item list in column QTY

Adding a Library Item from the BBT
If you have Library controller rights, you have the option of adding a new item to the library whilst constructing your building block.
1. With the BBT opened, click on the 'Add Item' (BLOCK) icon.


2. From the 'Select Library Item' menu, click on the 'Add Library Item' icon and the 'Add Library Item' menu will open.


3. Fill in this menu and click 'ADD'. The 'Add Library Item' menu will close and your new library item will be added to the library. It is now available to add as a building block item.
4. The 'Select Library Item' menu will re-open.

Reordering Building Block Items.
1. Click on any Building Block Item to put it into edit mode as follows:


2. Once in edit mode, the item position can be changed by pressing the 'up' and 'down' cursor key buttons.
3. The edit mode can be closed by clicking the 'Close Edit' icon on the right hand side of the Building Block item. However, it does not need to be closed.

Deleting a Building Block Item
1. With the Building Block tool open, click the 'Enable Delete Mode' icon
2. The icon will turn red and all Building Block items listed will be put into delete enable mode, displaying a trash symbol in its left hand column.


3. Click on the Building Block item you wish to remove and the a confirmation sub-menu will be displayed asking for confirmation of deleting the item.
4. Click 'DELETE' to remove the item. NOTE: This does not delete the item in the library.
STAKEHOLDERS
1. Stakeholders are managed in the stakeholders menu.
2. Click on the 'Edit Stakeholders' icon in the Toolbar and the stakeholders menu will open.


Editing a Stakeholder
1. Open the stakeholders menu and click on click on any stakeholder in the stakeholder list. The 'Stakeholder' sub-menu will open
2. Edit the stakeholder information and click 'OK'.

Adding a Stakeholder
1. Open the shareholders menu and click on the 'Add Stakeholder' icon to open the 'Stakeholder' sub-menu


2. Either:-
  • Select an existing employee using the 'EMPLOYEE' selector. This is preferable for any person listed as a company employee.
  • Enter a new stakeholder in the 'STAKEHOLDER DETAILS' section. This is preferable for adding non-employee based stakeholders such as contractors, consultants or non-Exec's'.

Deleting a Shareholder
1. Open the shareholders menu and click the 'Enable Delete Mode' icon
2. The icon will turn red and all stakeholders will be put into delete enable mode, displaying a trash symbol in its left hand column.
3. Click on the stakeholder you wish to delete and the a confirmation sub-menu will be displayed asking for confirmation of deleting the stakeholder.
4. Click 'DELETE' to remove the stakeholder.
NOTES
The NOTES tile holds all notes specific to the selected business.

Viewing / Editing a Note
1. Click on the note you wish to view or edit in the notes list
2. The 'Edit Note' sub-menu will open.


3. Edit the note accordingly.
4. Click the OK button

Adding a Note
1. Click the AddNote icon in the NOTES tile
2. The "Edit Note" sub-menu will open.


3. The date will automatically be set to today's date, but you have the opportunity to amend it accordingly.
4. Add a TITLE and NOTE.
5. Click the OK button

Deleting a Note
1. Click the 'Enable Delete Mode' icon in the NOTES tile
2. The Delete icon will turn red and all notes will have a delete icon in the first column, indicating that delete mode is enabled.
3. Click on the note you wish to delete.
4. A confirmation menu will appear asking if you are sure you wish to delete.
5. Click 'DELETE' to delete the note.
6. You can disengage the delete enabled mode at anytime by clicking the 'Disable Delete Mode' icon.
DOCUMENTS
  • Key employee documents can be uploaded, such as employment contracts, agreements, bonus targets, written warnings etc.

Uploading a Document
1. Open the documents folder by clicking the folder icon in the DOCUMENTS tile.
2. The Documents Folder will open


3. Click the 'Add Document' icon
4. The 'System File Dialog' will open.
5. Select a file or files to upload and click 'Open'.
6. The selected file(s) will be uploaded to Vizula and will appear in the Documents Folder.

Downloading a Document from the tile
1. Click the document directly from the DOCUMENTS tile.
2. The file will be downloaded.

Downloading a Document from the Document Folder
1. Click documents folder icon to open the Documents Folder.
2. The Documents Folder will open


3. Click any file to download it to your device.

Deleting Documents
1. Open the documents folder by clicking the folder icon in the DOCUMENTS tile.
2. The Documents Folder will open.


3. Click the 'Enable Delete Mode' icon
4. The icon will turn red and you can now select files to be deleted by clicking them. A trash icon will appear in the top right corner of the file icon indicating that it is ready for deleting. You may select as many file for deleting as you wish.
5. A large trash icon will appear in the document folder toolbar indicating how many files will be deleted.


6. Click the large trash icon 'Delete Documents' to delete the selected files.
7. A confirmation sub-menu will be displayed asking for confirmation of deleting the document.
8. Click 'DELETE' to remove the document(s).
v 0.986 - 05032023:092445
(c) 2023 Vizula Limited
)