INDEX

1. PRODUCT RISKS LIST (PRL) OVERVIEW
2. THE PRODUCT RISK LIST (PRL)
PRODUCT RISKS LIST (PRL) OVERVIEW
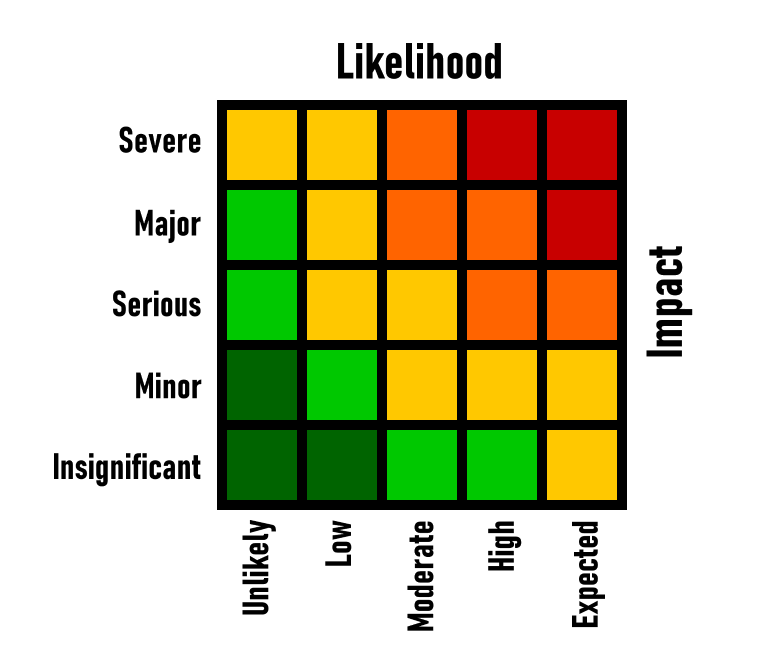
Every product in Vizula contains a Product Risks List (PRL) which can be used by the Project Manager to manage a list of risks which arise during the course of developing the product. The PRL can be utilised as much or as little as is determined useful by the Project Management team.
Each risk in the PRL contains five fields as follows:-


  • DATE - The date cannot be edited and is the date that the risk was added to the database.
  • DESCRIPTION - The description is an editable field used to describe / detail the risk.
  • MITIGATION - The mitigation is an editable field used to detail how the risk will be mitigated.
  • OWNER - The owner of the risk should be assigned as the risk is created. Ideally, the owner should be a Vizula user, in which case the risk will show up on the users 'MY ACTIONS' page, but anyone can be assigned as an owner.
  • DUE DATE - The due date should be set as the risk is created and is the date by which the risk is required to be mitigated. Overdue risks will be highlighted red in the list.

In addition to these five fields, the risk is assigned a 'Risk Level' which describes the importance of the risk as follows:-
  • RISK Level 1 (Most critical)
  • RISK Level 2
  • RISK Level 3
  • RISK Level 4
  • RISK Level 5 (Least critical)

The Risk Grid Matrix
The risk level is defined by two parameters - 'Likelihood' and 'Impact' which is converted to the risk level via a risk grid matrix as follows:-


The risk grid matrix can be modified to suit your own business / project requirements.
THE PRODUCT RISK LIST (PRL)
By default, the PRL is under control of the Project Manager, although this can be changed in the Access Rights page.

Adding a Risk
1. Click the 'Add Risk Item' icon and the New Risk sub-menu will be displayed.


2. Set the IMPACT and LIKELIHOOD parameters with the pull down selectors and a new risk will be added to the bottom of the PRL as follows:-


3. Add a description of the risk.
4. Normally, the mitigation will be left blank at this stage.
5. Click on the 'Owner' name and the 'Risk Owner' sub-menu will be displayed.


6. Select the owner from the sub-menu, creating a new employee if necessary. Click 'Select' to change the owner.
7. Click the due date and a calendar will open as follows:-


8. You can now select the due date.

Editing a Risk
1. Click on any risk to put it into edit mode as follows:


2. Edit the description or mitigation by typing straight into their fields.

Changing an Owner
1. Click on any owner to put the risk into edit mode and display the 'risk owner' sub menu as follows:


2. Select an owner from the list of employees and the risk owner will be changed.

Changing an Owner by Adding a New Employee
1. If an employee does not yet exist in the system, then he/she may be added during the editing process by clicking the 'AddEmployee' icon. The 'AddEmployee' sub-menu will be displayed as follows:-


2. Enter the details of the new employee and click 'Add'. The new employee will be added to the database and his/her name will appear in the list of employees.
3. Select the employee and the owner will be changed.

Changing the Due Date
1. Click on any due date to put the risk into edit mode and display the 'due date' selector as follows:


2. Modify the date and the due date will be changed.

Changing the Risk Level
1. Click on any Risk Level icon to put the risk into edit mode and display the 'Risk Level' selector as follows:-


2. Select the 'Likelihood' and 'Impact' from the drop down lists and the Risk level will be changed.

Deleting a Risk
1. Click the 'Enable Delete Mode' icon
2. The icon will turn red and all Risks will be put into delete enable mode, displaying a trash symbol in its left hand column.


3. Click on the risk you wish to delete and the a confirmation sub-menu will be displayed asking for confirmation of deleting the item.
4. Click 'DELETE' to remove the item.

Filtering the PRL
The PRL can be filtered by status value type by clicking on the relevant icon in the filter:-
  • Toggle this filter to show / hide all 'Risk Level 1' items.
  • Toggle this filter to show / hide all 'Risk Level 2' items.
  • Toggle this filter to show / hide all 'Risk Level 3' items.
  • Toggle this filter to show / hide all 'Risk Level 4' items.
  • Toggle this filter to show / hide all 'Risk Level 5' items.

Sorting the PRL
The PRL can be sorted by columns as follows:
  • RANK The list will be sorted according to Item Priority.
  • DATE The list will be sorted chronologically by date added to the PIL.
  • DESCRIPTION The list will be sorted alphabetically by description.
  • MITIGATION The list will be sorted alphabetically by mitigation.
  • OWNER The list will be sorted alphabetically by owner name.
  • DUE DATE The list will be sorted chronologically by Due Date.

1. Click on the blue column header to sort by that column. The column header will turn red to indicate sort is active.

Downloading a CSV file
1. Click on the download icon to download the full PRL as a csv file.
v 0.986 - 05032023:092337
(c) 2023 Vizula Limited
)